新的客户端似乎与drcom有较大的联系,我根据身在现场的同学抓的包,给出一点点分析,并基于scapy写出了一个简单的认证客户端(希望能用)。
1. Start
Start包很简单,向固定的MAC地址(01:80:c2:00:00:03)发送请求。
新的客户端似乎与drcom有较大的联系,我根据身在现场的同学抓的包,给出一点点分析,并基于scapy写出了一个简单的认证客户端(希望能用)。
Start包很简单,向固定的MAC地址(01:80:c2:00:00:03)发送请求。
用这个工具,我用来查询域名对应的IPv4/v6地址,相当于有了一个临时的准确的DNS解析,可以在一定程度上解决DNS污染的问题,配合路由器上的dnsmasq,效果还不错。
After googling this topic, I used to think it’s easy to flash the firmware to an ESP-12/12E, just connect the wires and simply click will do it. However I encountered some problems and I managed to solve it. So I write this post to share my experience.
My NodeMCU firmware is built on http://nodemcu-build.com/
After flashing with esptool / nodemcu_flasher from bbs.nodemcu.com / official ESP8266 Flash Tool, the ESP-12E could not boot normaly, I got outputs from baudrate 115200 or 74880 such as:
Fatal exception 28(LoadProhibitedCause): epc1=0x40224847, epc2=0x00000000, epc3=0x00000000, excvaddr=0x03001581, depc=0x00000000 ets Jan 8 2013,rst cause:2, boot mode:(3,0) load 0x40100000, len 29804, room 16 tail 12 chksum 0x4a ho 0 tail 12 room 4 load 0x3ffe8000, len 2208, room 12 tail 4 chksum 0xb7 load 0x3ffe88a0, len 8, room 4 tail 4 chksum 0xfb csum 0xfb don't use rtc mem data
or
Fatal exception 0(IllegalInstructionCause): epc1=0x40210354, epc2=0x00000000, epc3=0x00000000, excvaddr=0x00000000, depc=0x00000000 ets Jan 8 2013,rst cause:2, boot mode:(3,0) load 0x40100000, len 29804, room 16 tail 12 chksum 0x4a ho 0 tail 12 room 4 load 0x3ffe8000, len 2208, room 12 tail 4 chksum 0xb7 load 0x3ffe88a0, len 8, room 4 tail 4 chksum 0xfb csum 0xfb don't use rtc mem data
It’s something like this post, maybe it’s not enough to flash firmware to 0x00 and esp_init_data_default.bin to 0x3fc000. What I know is that the chip can’t boot.
After few days, I had an idea. I grabbed an NodeMCU Dev Board, and used esptool’s read_flash command to dump the 4 MByte flash:
$ sudo esptool.py --port /dev/ttyUSB0 read_flash 0x00 4194304 4m.bin # 4194304 = 4*1024*1024 4MByte
And, I successfully flashed it to an ESP-12E module by official ESP8266 Flash Tool with the config
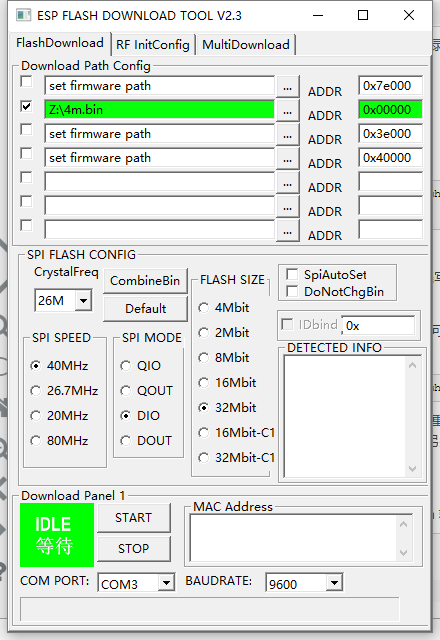
After a restart, try using 115200 baudrate to connect it. And everything seems good.
At last of this post, is my hardware connections and the 4MByte flash dump file. Make sure that GPIO0 is low if you want it to boot flash mode and high(or float) for normal mode.
4MByte binary file: 4m.7z
================== Below is the Chinese version =======================
本来以为刷个ESP-12E很简单的,但是我刷了就不行,后来找了个NodeMCU把它的flash整个读取了再整刷编程器固件就好了。
后来做了个用GPIO0做输出的电路,但是之后发现容易导致GPIO0电平不对(GPIO0有连外部电路,开机时GPIO0大约只有1.7V,导致无限进入刷机模式,后来把外部输出换了,GPIO0悬空,开机时就变回高电平了)。感觉GPIO0、2、15还是不要乱来比较好。
================================================================
Later I encountered a problem like
“boot mode:(7,7)
waiting for host”
And the solution is that make sure GPIO15 is LOW, instead of float.
表现有两个:
第一,会被跳转到如 http://www.jd.com/?utm_source=xxxxx&utm_medium=xxxxxx&utm_campaign=xxxxxx&utm_term=xxxx 这样的地址,百度一轮发现应该是TCP劫持。
第二,在浏览商品时,页面被插入广告,按F12发现在<head>里面被插入了一段script。
怎么破?
服务器为Linux系统,要架设代理服务器,若是http/SOCKS代理则需要安装软件;若是用自带的ssh来作为代理,就可以少装一个软件。
服务器与客户端均可用IPv6。
打开/etc/ssh/sshd_config,保证 ListenAddress 没有禁止IPv6地址,然后找到下面的 AddressFamily ,把它默认的 inet 改为 any。(inet即仅IPv4,inet6为仅IPv6,any为二者都监听)
重启SSH服务,运行
netstat -a
发现 tcp 和 tcp6 都有ssh的LISTEN,就对了。
我这里用的是putty,如果是其他系统或其他客户端,请自行百度相应教程。
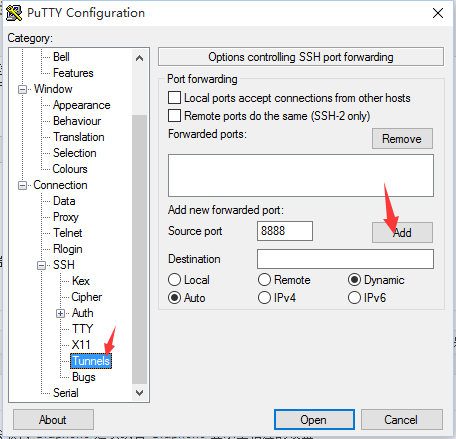
在putty中,填好服务器的IPv6地址和端口后,找到 Connection→SSH→Tunnels,输入一个本地端口,然后选择 Dynamic ,点 Add ,就可以连接了。认证完成,代理就可以用了。接下来就是在浏览器中配置一个 127.0.0.1:本地端口 的SOCKS5代理,大功告成。
如果是自带 OpenSSH 客户端,如 Windows 10 或各 Linux 发行版,一条命令即可解决(先在远程服务器放好SSH公钥):
ssh -N -D 127.0.0.1:8888 root@remote_ip
转自 https://i-meto.com/post/82/
我校夜间断网,然而IPv6不受影响,手上有一个Aliyun的ECS,于是打算给ECS弄个IPv6,再架设一个代理。
我们利用 HE.net 提供的免费 IPv6 隧道来实现,这种方法有一个前提,就是你的 VPS 必须是独立 IP 的,并且支持双向 Ping 通。
首先我们进入官网申请一个用户,这个没什么难点,用户信息可以填写真实的,不用担心泄露问题。
然后点击左上角的 Create Regular Tunnel 创建一个 IPv6 隧道。在 IPv4 那一栏填入自己 VPS 的 IP,节点选择 HK 或者 JP。
申请成功后打开 Example configurations 选项卡,OS 选择 Linux-route2,会看到类似以下配置信息:
modprobe ipv6 ip tunnel add he-ipv6 mode sit remote ***.***.***.*** local ***.***.***.*** ttl 255 ip link set he-ipv6 up ip addr add 2001:470:***:***::2/64 dev he-ipv6 ip route add ::/0 dev he-ipv6 ip -f inet6 addr
在运行这些命令之前,我们还需要做一件事。
阿里云默认禁用掉了 IPv6 支持,所以我们需要在配置文件里面将其打开:
/etc/sysctl.conf
net.ipv6.conf.all.disable_ipv6
、net.ipv6.conf.default.disable_ipv6
、net.ipv6.conf.lo.disable_ipv6
,把后面的值 1 全部改为 0运行 ifconfig ,查看接口是否正常。
为了方便,可以给获得的 IPv6 地址绑一个域名,加上一个AAAA记录即可。
GRUB2的commandline:
set isofile="/deepin-15-alpha2-amd64.iso" search --file $isofile --set=root loopback loop $isofile linux (loop)/live/vmlinuz.efi boot=live union=overlay username=user quiet live-config findiso=$isofile locales=zh_CN.UTF-8 initrd (loop)/live/initrd.lz boot
grub4dos的 menu.lst 写法,需要先在iso的live目录下提取 vmlinuz 和 inirtd.lz :
title Deepin 2015 Live CD find --set-root /deepin-15-alpha2-amd64.iso kernel /vmlinuz boot=live union=overlay username=user quiet live-config findiso=/deepin-15-alpha2-amd64.iso locales=zh_CN.UTF-8 initrd /initrd.lz boot
相关参考:
最近在学习数据结构,真的是不简单。看到这篇文章,简单易懂,转载下来给自己回味。原文:http://bbs.ahalei.com/thread-4419-1-1.html
前几天用scapy写了个用于802.1x认证的小程序。写完了回顾一下,虽然花了自己两天,但是其实是相当简单的。
今天找了一下,发现 http://blog.csdn.net/wang_walfred/article/details/40044141 一文,对入门非常有帮助。如果当时看了,至少能少耗一天呀。
在这里补充一下我的一点心得。
我的开发是从抓包开始的。抓包之后,就可以通过
pkts = rdpcap('xxxx.pcap')
读取,读取之后就可以用类似列表的办法如 pkgs[1] 来操作特定的数据包。
下面是一些命令:
hexdump(pkt) #have an hexadecimal dump pkt.command() #return a Scapy command that can generate the packet pkt.show() #for a developped view of the packet
其中 pkt.command() 可以返回一个string,运行就可以生成相应的packet,之后的修改就很方便了。
最后的心得是sniff:
sniff(filter='your filter', prn = lambda x: x.show()) # -> list of packets
可以调用prn指定的函数对过滤到的包进行处理。